Source: WordPress Support
Learn how to add images to your posts from your computer, another website, or your Media Library.
Note: Some of the instructions from this guide are referring to the WP Admin dashboard. You can get to this dashboard by adding
/wp-adminto the end of your site’s url (e.g.: example.wordpress.com/wp-admin)
Insert an Image from your Computer
- Place your cursor where you want your image to appear.
- Drag your image from your computer to the editor.

Insert an Image from the Web
This method will not necessarily upload the document/file to your blog’s Media Library. Files from specific sites like Blogger will be uploaded and your image link will be updated. If the file is hosted elsewhere and does not get automatically uploaded to your Media Library, the image will no longer work on your blog if it gets deleted from that site.
- Place your cursor where you would like the image to appear, and click ⊕ add symbol, and then the option to add a media will appear, like in the example below:

- Choose Add via URL and paste the URL of the file before clicking Upload.
- You will be given the option to edit the image settings before inserting the image into the post/page by clicking on the Edit button. To learn more about these settings, visit our page on Image Settings.
- When finished choosing your image settings, click on the Insert button.


Insert an Image from your Media Library
- Place your cursor where you would like the image to appear, and click on the Add Media icon found directly above your editor.
- Locate the image you wish to insert and select it. You’ll be able to navigate among Images, Documents, Videos and Audio files. Note that the last two options are only available with the WordPress.com Premium and Business plans.
- You will be able to edit the image’s settings before inserting your image. These fields will already be populated if you previously added the information when you uploaded your image to the Media Library. To learn more about these settings, visit our page on Image Settings.
- When finished choosing your image settings, click Insert at the bottom.


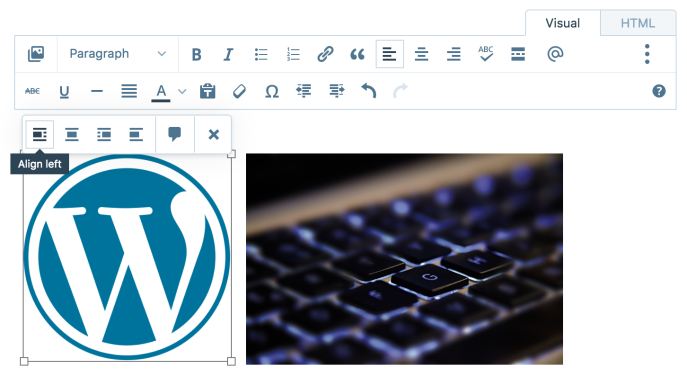
Image Alignment
When inserting images into your posts and pages, you can have your text wrap around them. Just click on your inserted image to select it, then choose the alignment you want.

Side by Side
If you would like to see images appear side by side on the same line, put the images next to each other and give them both either left or right alignment.
Make sure the images are small enough that they will both fit on one line, including borders and margins. Otherwise, one of the images will be bumped to the next line. If this happens, you can resize the images so that they can fit side by side.
No text wrapping
If you don’t want the text to wrap around your image, you can remove the left or right alignment from your images. Click the image and select the No alignement option. The text will then stop wrapping around your image.

Editing your Inserted Images
Note: The instructions from this guide are referring to the WP Admin dashboard. You can get to this dashboard by adding
/wp-adminto the end of your site’s url (e.g.: example.wordpress.com/wp-admin)
When creating a post/page from the WP Admin dashboard, you can edit inserted images to flow with your content in an appealing way. You can access these settings by selecting the image you wish to work with and clicking on the pencil icon.

Learn more about the ways you can edit your images!
Troubleshooting
If you’re having a problem uploading images, please check our troubleshooting tips. You may also want to try some troubleshooting tips listed on the Browser Issues page.
Images should be saved in RGB mode, and you will see the best results if you use the sRGB color profile and the .png format. Animated gifs will not display unless they are displayed at 100% full size.